Search documentation
Find a documentation page by the words on it.
Documentation
Managing Saved Cohorts
A saved cohort is a list of patients you want to keep: the people with diabetes and no recent A1c, or everyone on a statin. This page covers what you can do with one once it is saved. To make one, see Practice Agent and Cohorts.
This feature is controlled by the Practice Agent feature flag. If you do not see it in your clinic, contact Serelora at support@serelora.com and ask for it to be turned on.
Cohorts belong to the person who saved them. You see your own, and no one else sees them.
Step 1: Open the Saved cohorts tab
Select Practice Agent in the sidebar. The right side opens on the Saved cohorts tab. It lists each cohort with its Name, the number of Patients, Last refreshed, Created and Actions. A cohort with no list yet reads No snapshot. A long list shows Show more at the bottom.
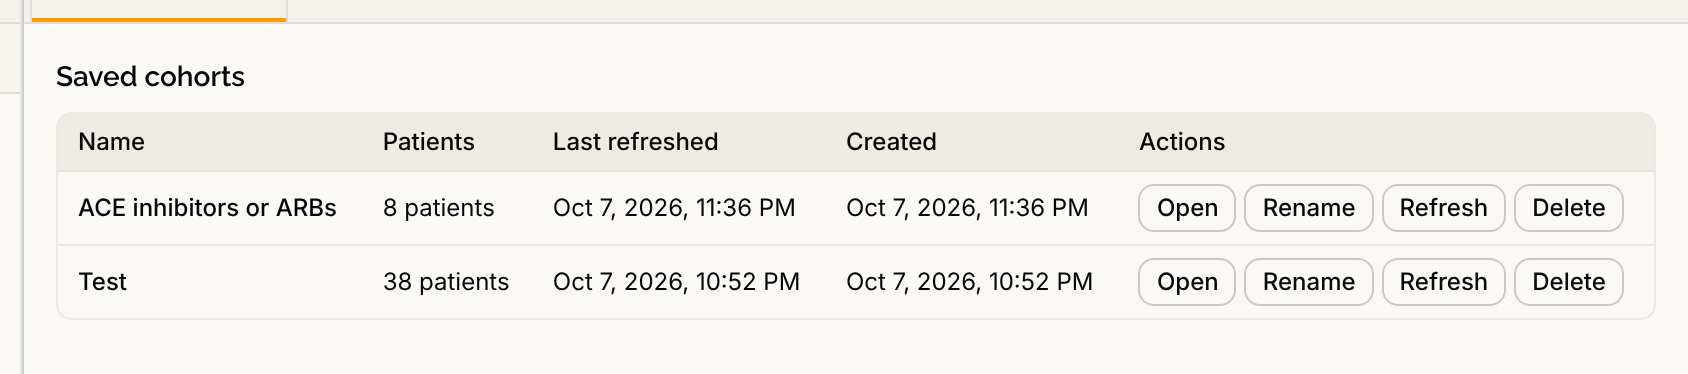
You can also ask in the chat: "Show my saved cohorts."
Step 2: Open, rename, refresh or delete
- Open. Select Open, or select anywhere else on the row. The most recent list opens in its own tab.
- Rename. Select Rename. The name becomes a box in the row. Type a new name of up to 120 characters and select Rename cohort, or Cancel. In an open cohort tab you can also select its name, type, and press Enter to save or Esc to discard.
- Refresh. Select Refresh to run the same search again over today's records. The result opens in a new tab named for the cohort, and Last refreshed updates. A cohort is a snapshot of who matched when it ran, so refresh before you act on an old one. You can also ask "Refresh my most recently saved cohort."
- Delete. Select Delete. A window asks Delete “name”? and says it will be removed from your saved cohorts. Select Delete cohort to confirm, or Cancel.
If something fails, the reason shows under the cohort's name.
Step 3: Search and sort a cohort
In an open cohort tab, type in Search by name to narrow the table, and use Sort patients by to order it by Name, Age or Last visit. The table loads more rows as you scroll. Select a row to open that patient's chart in a new browser tab. Select a chip in the Matched because column to open the entry that put the patient in the list.
On a narrow panel, some columns drop out to make room: first Last visit, then Registration, then Email and Phone. Drag the panel wider to see them.
Step 4: Export a cohort to a file
Select Export CSV in the cohort's header. The button is there only if you have permission to export, which is an Admin by default.
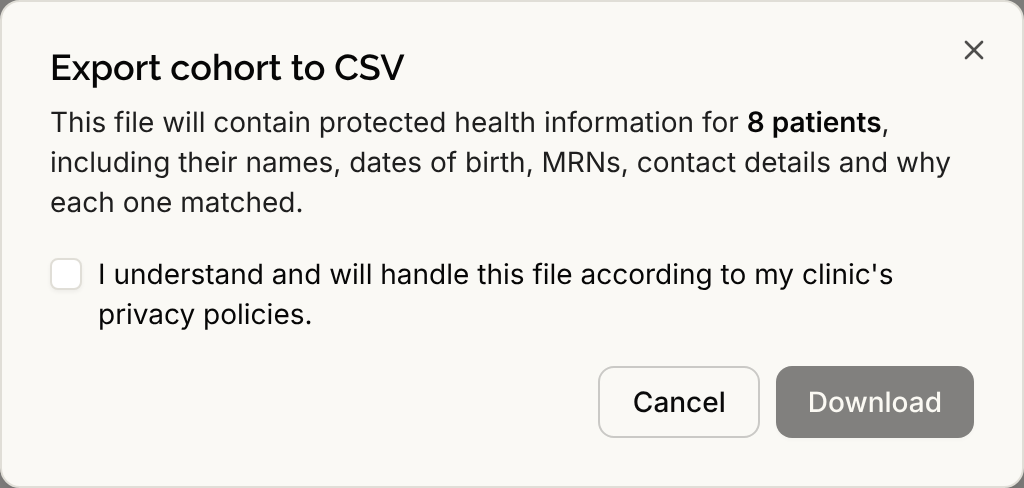
The Export cohort to CSV window warns that the file holds protected health information for that many patients, including names, dates of birth, record numbers, contact details and why each one matched. Tick "I understand and will handle this file according to my clinic's privacy policies." Then select Download. It asks again every time.
The file is named cohort- followed by the cohort's number. It has one row per patient and these columns: Name, Date of birth, Age, Sex at birth, MRN, Email, Phone, Registration, Last visit and Matched because. It holds only patients who are still on your panel. A cell that starts with =, +, - or @ gets a leading apostrophe, so a spreadsheet shows it as text and does not run it as a formula.
Each export is recorded in the audit log before the first byte is sent.
How long lists are kept
- A list you never saved is removed after 30 days.
- A saved cohort is kept until you delete it.
- A list that was used to send an intake campaign is kept, so the campaign can still be traced.
Closing an unsaved cohort tab asks whether to save it: Cancel, Don't save or Save.
Who can do this
Using saved cohorts needs permission to use the Practice Agent. Exporting needs the separate export permission as well as the Practice Agent permission. Both are Admin only by default. A clinic admin can change this in Custom Roles and Per-User Permissions.
Good to know
- Treat the file like a patient list and handle it under your clinic's privacy policies.
- To turn a cohort into a report, see Practice Reports from a Cohort.
- To message a cohort, see Intake Campaigns from a Cohort.